
| Icon |  |
|---|---|
| Name of gadget | Checkpoint |
| Section | Gameplay Gear |
| Number of Tweak pages | 3 |
| Author | LadylexUK, QuietlyWrong |
| Last updated | 06 April 2020 [v2.09] |
Description
This gadget is used to create a checkpoint in your game. A checkpoint is a position in your scene where your player will respawn after death. Only one checkpoint can be active at any one time. A checkpoint is activated when the player first runs into the zone of the gadget. If there is another checkpoint further on and the player runs into it, then that becomes the active checkpoint. When they die, instead of returning to the start of the scene (which is the default) they will reappear at the last active checkpoint. You can also activate a checkpoint using wires so the player does not need to walk into a zone.
The checkpoint has a gizmo which includes a target point – the place where the player will emerge from – and a direction. The direction will be the way the player is facing upon respawn. The orientation that the player is respawned in is determined by the orientation of the player’s Controller Sensor (or the microchip it is stamped in). In a default puppet, the Controller Sensor gadget is oriented facing the front of the puppet, so if you make your own vehicles or player characters, you should ideally orient the Controller Sensor similarly, i.e. facing the front of the vehicle/character.
Example Tutorial (adapted from Media Molecule)
- Stamp a Checkpoint
- Stamp a light
- Point the light down at the checkpoint.
- Connect currently active on the checkpoint to the power port on the light
- Stamp a blank puppet
- Enter test mode.
- Possess the puppet.
- Walk up to the checkpoint and the light will go on.
Tweak Menus
Click on arrows to reveal
Tweak Menu 1: Properties & I/O
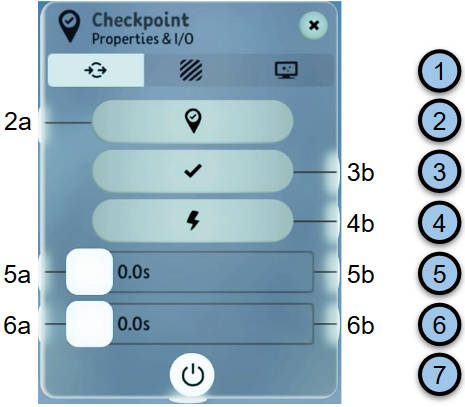
[image from v2.07; unchanged in 2.09] |
|
- Menu page indicator
- Activate Me
Send a signal to this input connection to activate this checkpoint (make this checkpoint the current active one, that is; the player will not respawn). Use this if you want more control over checkpoint activation that is provided by the player entering the checkpoint’s zone. Because you can have only one active checkpoint, this will automatically deactivate whichever other checkpoint is currently active. - Currently Active
This outputs a signal for the duration that this is the currently active checkpoint. You might use it to trigger related logic like a visual effect to show the player that this checkpoint is on. - Just Spawned
When a player dies and is respawned from this checkpoint, this outputs a pulse at the moment of respawning. You might use this to trigger a sound effect representing the restoration of the player, for example. - Delay Before Respawn
Here you can specify a delay, in seconds, between the beginning of the respawn (typically, when the camera wipe takes place upon “death”) and the appearance of the player’s controlled character. You may want a delay so you can show a quick respawn animation, for example. Note that a delay does not work well with most of the wipes in the “Wipe Effects” menu tab unless they use the “Transition via Colour” option. - Delay Next Respawn
Here you can specify a delay, in seconds, between the respawn of multiple players if several need to respawn together. Obviously, this is not applicable in single-player games. - Power
This is where you turn the gadget on/off.
Tweak Menu 2: Zone Size

[image from v2.07; unchanged in 2.09] |
|
- Menu page indicator
- Zone Shape
Choose the shape of the checkpoint’s activation zone, from sphere, cube, cylinder, cone, ellipsoid, whole scene - Zone Size
Define the dimensions of the checkpoint in metres, with options depending on the shape. You can also drag the edges of the zone itself directly on the screen, and a rotation handle allows you to specify the direction a player will be facing when spawned here. - Power
This is where you turn the gadget on/off.
Tweak Menu 3: Wipe Effects
 
[images from v2.07; unchanged in 2.09] |
|
- Menu page indicator
- Wipe Style
Choose the shape of the wipe that accompanies the transition from the previous view to the new respawn camera position:- Bokeh – the screen dissolves into random coloured circles of different sizes, resembling dozens of out-of-focus highlights. It’s a distinctive “Dreams” effect.
- Dissolve – a more conventional, uniform fade effect.
- Linear – the screen ‘wipes’ from one side to the other; the direction depends on tweaks 9 & 10.
- Circular – a circle expands outwards from a point until it fills the screen from edge to edge (use either tweaks 9 & 10 or 11 to specify the centre of the circle).
- Star – similar to the “Circular” option, but using a five-pointed star shape instead of a circle.
- Heart – similar to the “Circular” option, but using a heart shape instead of a circle.
- Wibble – dissove between views with a wave-like distortion effect across the whole screen, reminiscent of the film/TV “memory flashback” effect.
- Transition via Colour
Instead of a one-stage wipe from the old view to the new, you can have a two-stage effect where the screen wipes to a block colour, then from there to the new (respawn) view – for example for a “fade to black”. Switching this on enables the two-stage effect. - Wipe Colour
Here you choose the colour for a two-stage “Transition via Colour” effect [3], if that tweak option is turned on. - Glow
If using a “Transition via Colour” effect [3], you can specify how much “glow” the wipe colour has. - Reverse Fade In
Only applicable when using a “Transition via Colour” effect [3] and a wipe style that has direction (linear, circular, star or heart) – this causes the first part of the wipe to move in the opposite direction (for circular, star and heart: from the outside of the screen to the middle). - Reverse Fade Out
Only applicable to wipe styles with a direction (linear, circular, star or heart) – this causes the wipe (the second stage, if using “Transition via Colour” [3]) to move in the opposite direction (for circular, star and heart: from the outside of the screen to the middle). - Softness
Only applicable to wipe styles with a direction (linear, circular, star or heart) – this causes the edge(s) of the wipe to be softened to a lesser or greater degree (there is an element of “dissolve” at the edge). At 0%, the transition egde is sharp; at higher values the transition edge becomes indistinguishable, especially at lower speeds. - X Position/Direction
Together the X Position and Y Position are used to set either the direction of the wipe (for a Linear Wipe; the default is a vertical edge moving from left to right) or the co-ordinates on which it is centred (Circular, Star and Heart Wipes; this defaults to the centre of the screen). The handle on the box between X and Y allows both to be tweaked at the same time. - Y Position/Direction
See X Position/Direction [9]. - Track Object
For Circular, Star and Heart Wipes, you can use this tweak to select an object in the Scene, which forces the wipe to focus on that object, if it is on screen. You might typically use this to centre the wipe on the player character if the respawn position on screen may vary. - Fade-In Time
Only applicable when using a “Transition via Colour” effect [3], this allows you to specify the length of time over which the screen initially wipes to the chosen wipe colour. - Fade-Out Time
This tweak allows you to specify the length of time over which the screen wipes to the respawn view. Note that the character will be on screen even if – due to a slow wipe – it is not visible to the player, and will therefore be controllable unless you make the effort to disable controls during the fade-out. - Transition Done
Fires a (pulse) signal as soon as the wipe is completed, which might be used for example for reactivating the player controls if you switched them off at the point of respawn. - Power
This is where you turn the gadget on/off.
Lex Tips
Checkpoints are very useful for platforming games, as your player will get frustrated with you if they have to go back to the start every time they make a mistake. Place your checkpoints before or after particularly difficult sections of your map.
Useful Tutorials
Version Updates
v2.03: New options to “Delay Before Respawn” and “Delay Next Respawn” added; screen wipe configuration has been added (new menu tab) to provide most of the same options as the Wiper gadget.

Comments and Feedback